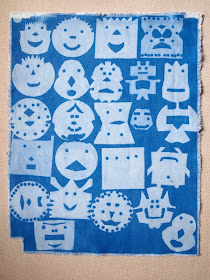
This year for Sam's school fundraiser art auction, we decided to create a class project using Inkodye. It's a photo-sensitive dye that I've been curious about for a while (thanks to among others Cisco Home and How About Orange). Class was the perfect opportunity to try it out.
Inkodye is a dye that develops color when exposed to sunlight. It's like liquid sun-print in a bottle and can be applied to any natural surface to make a print. In our case, we used it to make custom fabric for a hand-sewn art tote. Each student made several cut-outs from paper, and chose their favorite one to use as a stencil on our bag. When the stencils were ready, they were placed on prepared canvas panels and taken outside. Under sunlight, the ink-coated fabric turns blue, and the places shaded by the stencils stay white. Add a little sewing and viola, class-designed textile tote.
 |
| alien and/or robot |
Teacher set-up: I prepared two canvas panels (the front and back of our bag) by coating them each on one side with Inkodye. For fabric I chose Organic Canvas Deluxe in PFD Bleach White by Robert Kaufman (available at Sew Mama Sew.) It's a great weight, has a nice texture, and takes dye beautifully. After a little trial and error, I found a 50/50 dilution of Inkodye worked best to coat the fabric. It seemed to flow easier, last longer, and had no noticeable difference in color strength after exposure. A small, smooth paint roller worked best for even coverage. Bonus tip! : If you are using a roller, dye will soak through, so lay canvas on a non-porous, clean work surface. I used a sheet of plexiglass underneath mine. And since Inkodye is UV sensitive, all of this was done after dark under safe incandescents and left to hang-dry overnight in a dark room.
 |
| An empty hydrogen peroxide bottle makes a great light-safe container. |
Step two involved creating cut-out stencils designed by the students. Each student made several cut-outs from paper, practicing concepts of symmetry and silhouette, and chose their favorite one to use as a stencil on our fabric.
Here is a photo of a demo canvas prepped for the class. Indoors we laid each stencil on a pre-coated piece of canvas. Then we laid a plexiglass guide on top to hold the shapes flat against the fabric. Time for exposure to sunlight! Here you can see it is just starting to turn blue. The students were very excited to watch the transformation. Like magic!
Since it was cloudy, we left the canvas out for 30-40 minutes. After Inkodye is exposed, the remaining unexposed dye needs to be washed out or it will slowly turn color under UV too. I found that the hotter the water, the better for washing out dye so I used the "sanitize" cycle in my washer and it worked great. After running it through the cycle, just for good measure, I scrubbed the panels by hand under hot water with detergent and a stiff brush. Results below! You can see that the relative transparency of the thin white paper allows some light to leak through during a long exposure.
 On my own, during a properly sunny day, I exposed two final panels with the students' stencils, using same method as above. I let the full sun burn the panels a good 15-20 minutes to get a deep blue. You can see how some interesting edge quality happens when you get strong exposure and a stencil that's letting a little light leak in.
We are lucky to have another art volunteer that sews. Ta daa...! Panels transformed to bag.
The students were very proud of their personal contribution to the fundraiser and had fun learning a new process too. What is fun about sun-printing is that it is so simple-- even a piece of cheap construction paper will fade nicely in the sun to reveal shapes of items placed on it, no dyes required. But that is a post for another time.... As for Inkodye, I cannot wait to experiment with more colors and materials!


No comments:
Post a Comment